Installation Guide
Table of contents
Expand to view
Before We Begin
Skyrim Unification Project and Wabbajack are licensed under the Creative Commons Attribution-NonCommercial-ShareAlike 4.0 International license. This installation guide is provided “as-is” and will be updated if deemed necessary. For any assistance and support with the modlist, please see the “Modlist Assistance and Support” section on the home page of this Wiki.
This Wabbajack contains the “Full” install with every available module already enabled and patched for in generated outputs. Support is only provided for this configuration, but users are free to use different combinations of the modules and utilize the unofficial helpdesk channel.
![]()

System Requirements
Recommended specs TBD based on user feedback. Please note that Project Arch in particular can be visually demanding and requires both a reasonably current CPU and GPU.
My specs: 5700x, 7900GRE (16gb), 32GB ram, NVME drive for installed list files.
The list is designed for at least 8GB of VRAM. Having less than this will result in a poor experience.
- An SSD is required to the play the modlist.
- Only Windows 10 or 11 operating systems are supported. Windows LTSC, special variants, lightened editions or any other modified variant WILL NOT WORK. Linux installations also WILL NOT WORK.
Before proceeding with the Installation Guide, please ensure that you have the following:
- Windows 10 (service pack 22H2 or later) or Windows 11 (service pack 24H2 or later).
- Please see the current list metadata in Wabbajack for the install space requirements. Additional space is required for Wabbajack to unpack temporary files.
- The latest version of Skyrim Special Edition, in English, on Steam. This is required, other methods of game ownership are not compatible.
- A Nexus Mods account.
We also strongly recommend a Nexus Premium Membership , which speeds up the install by auto-downloading mods. (Without Premium, you are looking at a twelve hour, highly manual task.)
For System Requirements and other information, please view the System Requirements & Installation page of this wiki.
If you are updating from a previous installation, click here for update instructions.
Pre-Installation
Before we begin the actual installation process, some steps must be taken to ensure that all necessary prerequisites and dependencies are installed on your system.
Installing Microsoft Visual C++ & .NET
- Install Visual C++ x64.
- Install .NET Runtime 9.X.X Desktop x64.
- Install .NET 6.0 Runtime Desktop x64.
If you have already installed Visual C++, please make sure to install it again and use the Repair option to get the latest version of the redistributable. DO NOT SKIP THIS STEP or Mod Organizer 2 and the game may fail to launch.
Page file and Crash Prevention
Larger Skyrim modlists require a significant amount of memory to run, running out of memory will result in crashes and many other potential issues. Due to Skyrim Unification Project’s size and the number of files, this step is NOT optional, regardless of your PC specs.
If you are limited on space, the page file can be set after the installation process is over. A detailed guide on how to set your page file can be found here.
Shader Cache (NVIDIA Users Only)
For NVIDIA GPU users, it is recommended to boost the size of your shader cache. These settings have been shown to improve stability, and while they may not be entirely necessary, they are still recommended.
In order to adjust your Shader Cache settings follow the steps below.
- Right click on your desktop and select
NVIDIA Control Panel - Navigate and click
Manage 3D Settingsin the left pane. - Scroll down the Global Settings tab until you see Shader Cache Size.
- Double click
Driver Defaultto the right of Shader Cache Size and select10 GB. - Click
Applyin the bottom right hand corner. - Exit out of the NVIDIA Control Panel.
Steam Setup
If your Steam Library is located in the Program Files folder, please read this guide by LostDragonist. Storing your library in locations such as Desktop, Documents, Downloads, OneDrive, or any other Windows-managed folders will cause issues with installing and playing the list.
- In Steam, disable automatic updates for Skyrim Special Edition.
- Right-click on Skyrim Special Edition, go to Properties > General and uncheck
Enable Steam Overlay while in-game. - Ensure that your Skyrim Special Edition is installed in English.
- Ensure that you properly install the Creation Club content to prevent hashing errors while downloading the list.
Changing the Game Language
Due to limitations with Wabbajack, Skyrim Unification Project only supports the English Steam version of Skyrim Special Edition.
- Right click on Skyrim Special Edition in Steam.
- Click
Properties. - Click
Language. - Set the Language to
English.
Installing Creation Club Files
Due to some change Bethesda made with the 1.6.1130 update (January 17, 2024), Steam has begun including the free Creation Club (CC) files with the base installation of Skyrim. However, these files do not have the same file hash as the files that are downloaded from the in-game Creations menu for Anniversary Edition (AE) users. In order to comply with Wabbajack policy, and minimize issues for users who own the AE update, Skyrim Unification Project is compiled using the versions of the CC content that are obtained from the in-game Creations menu.
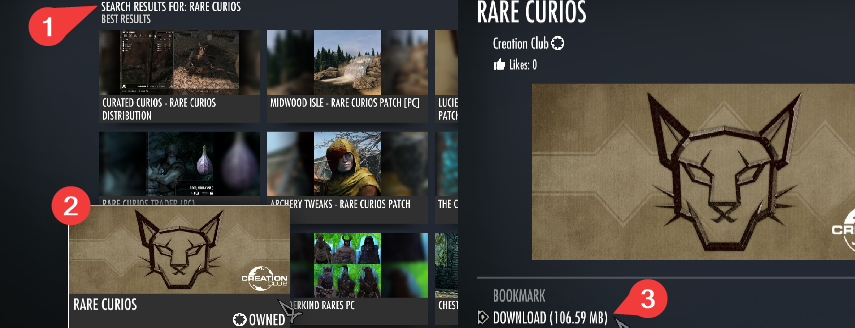
Please follow the steps below if you are failing to download the Rare Curios files:
- Navigate to your Skyrim Special Edition’s Steam
Datafolder. - Delete both Rare Curios files:
ccbgssse037-curios.bsa&ccbgssse037-curios.esl. - Launch Skyrim Special Edition from Steam and select Creations at the main menu.
- Select Search at the bottom and search for
Rare Curios. - Select the card titled
Rare Curiosand press Download. - Once the download is finished, exit the game and rerun the Wabbajack installer.
- DO NOT
Alt+Tabduring this process or it will fail to properly download these files.- DO NOT verify your game files after doing the steps above as it will revert the “correct” file hashes for the CC files you just downloaded.
Running the Game
Before continuing onto the rest of the installation process, Skyrim Special Edition needs to be ran at least once. This step should have been accomplished if you have been following along, however if it somehow has not been done, the game must be ran at least one time through Steam in order to generate files that Skyrim Unification Project needs to function.
- Select The Elder Scrolls V: Skyrim Special Edition within your Steam library, then click
Play. - The Skyrim Special Edition launcher will offer to auto-detect your settings. When this happens, click
OKand then clickOKagain, these settings do not matter. - Click
Exitto exit the Skyrim Special Edition launcher.
Wabbajack Installation
Skyrim Unification Project requires Wabbajack version 4.0.0.0 or later. Attempting to install the modlist on an older version of Wabbajack is not supported and may result in installation errors.
After ensuring that you have all of the necessary dependencies and your Skyrim Special Edition is configured correctly, we will need to install Wabbajack - a modlist auto-installer that supports Skyrim and many other games.
- Go to the Wabbajack website.
- Click Download to download the newest version of Wabbajack.
- Create a new folder on your PC outside of any Windows-managed folders, e.g.
C:\WabbajackorC:\Games\Wabbajack. - Move the
Wabbajack.exeyou just downloaded into the folder you created in the previous step. - Run the
Wabbajack.exeto install Wabbajack.
There are some restrictions on the install location of Wabbajack. You CAN NOT place the folder into any of the following locations:
- The
Program FilesorProgram Files (x86)folders, or their subfolders.- The
Usersfolder, or any of its subfolders.- The
Steamfolder, or any of its subfolders.- The
Skyrim Special Editionfolder, or any of its subfolders.- The
Desktopfolder, or any of its subfolders.- The
Documentsfolder, or any of its subfolders.- Any folder that contains non-English characters in its filepath.
- Any cloud storage folders (e.g., Dropbox, OneDrive, etc.)
Installing Skyrim Unification Project via Wabbajack
Once the Wabbajack app is installed, you will be able to download Skyrim Unification Project off of the Wabbajack Gallery.
-
Click on the Browse lists button on the left-hand side of the Wabbajack app.
- Make sure the Non-Featured box is checked.
- Type “Skyrim Unification Project” into the search bar.
-
Click on the image card for Skyrim Unification Project.
-
Click the Download & Install button.
- Wabbajack will then download the Skyrim Unification Project wabbajack file and manifest and bring you to the installation page.
-
Once on the installation page, point Wabbajack to your desired
Installation Location(red) andDownload Location(green). - Click on the Install button located at the bottom right.
Nexus Premium users will experience a mostly automated installation process. Non-premium users will need to manually download files as Wabbajack goes through the required files for the modlist. Downloading Skyrim Unification Project will take anywhere from two to twelve plus hours based on your Premium status, ISP & internet speeds, and hardware. It is highly recommended that you go and do something else while the process is taking place, ensuring that your PC does not fall asleep during the process.
Problems with the Installation
If you encounter any problems during your Wabbajack installation, please read over the Common Installation Issues page of this wiki. If you are unable to find the answer to your issue, then you can join the Skyrim Unification Project discord server and seek support in the #help-desk channel.
Successful Installation
Once you have completed your installation and received the green Wabbajack Success message in the Wabbajack app, you should move on to the Recommended Reading section of this wiki to cover post installation process.